
|
Heavy Duty
Transfer Case Mounts With Bill Johnston
|
|||
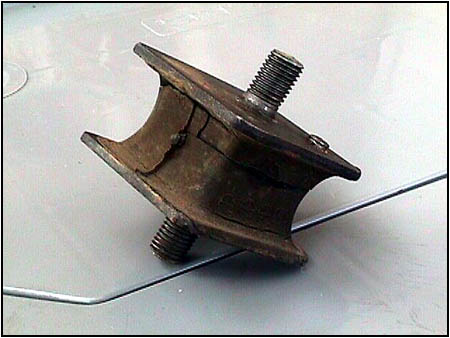 This
is a common occurrence when you push the drive train to it's limits.
The mount is designed to be like a fuse... it breaks before an
expensive part in the t/case explodes. And the most common mount to
break is the drivers side (short arm). This
is a common occurrence when you push the drive train to it's limits.
The mount is designed to be like a fuse... it breaks before an
expensive part in the t/case explodes. And the most common mount to
break is the drivers side (short arm).
 When
power goes to the t/case it tries to lift the short arm side of the
case, stretching the mount. If you catch it quick enough all you
have to replace is a mount. But you will see marks on the body about
an inch above the mount. You can see the marks in a picture later in
the article. But what if you could use a mount that allows the full
'stretch' of a stock mount without the 'snap' that comes at the end?
Spidertrax has come up with a mount that cushions during compression
and extension, but won't snap in half. When
power goes to the t/case it tries to lift the short arm side of the
case, stretching the mount. If you catch it quick enough all you
have to replace is a mount. But you will see marks on the body about
an inch above the mount. You can see the marks in a picture later in
the article. But what if you could use a mount that allows the full
'stretch' of a stock mount without the 'snap' that comes at the end?
Spidertrax has come up with a mount that cushions during compression
and extension, but won't snap in half. |
|||
Parts included with this kit: |
|
||
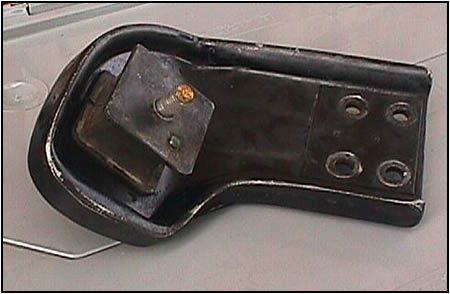
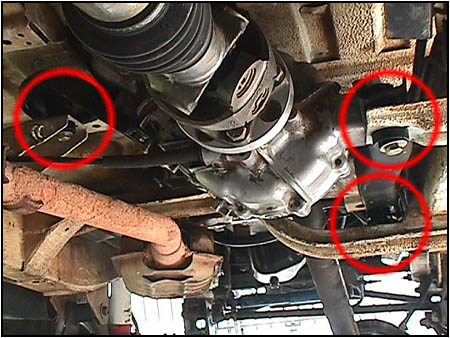
 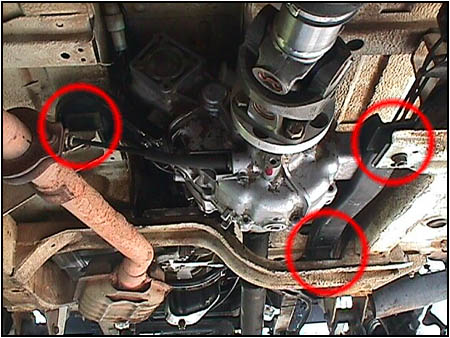 There
are three mounts that have to be changed. You
can see the stress cracks that occur after hard wear
by taking a look at the mount on the right. Click through
the picture to see a better detail shot. The hardest mount to get at is
the short arm mount on the left. So that is where we will start. There
are three mounts that have to be changed. You
can see the stress cracks that occur after hard wear
by taking a look at the mount on the right. Click through
the picture to see a better detail shot. The hardest mount to get at is
the short arm mount on the left. So that is where we will start. |
|||
 After
parking the rear tires on a set of car ramps things were a bit
easier to get at. When looking at the mount from the rear of the
vehicle it seems an easy replacement... After
parking the rear tires on a set of car ramps things were a bit
easier to get at. When looking at the mount from the rear of the
vehicle it seems an easy replacement...
 until you remove the mount
retaining nuts and realize that there isn't enough room between the
frame and the body to slide the old mount out. I found it easier to
remove the bolts at the other end of the short arm from the transfer
case while using a block of wood and a floor jack to support the
weight of the transfer case. Make sure the case is held firmly in
place and the floor jack won't roll. Safety First! Then you can
remove the mount bushing from the short arm easily. Replace the
short arm on the transfer case right away. until you remove the mount
retaining nuts and realize that there isn't enough room between the
frame and the body to slide the old mount out. I found it easier to
remove the bolts at the other end of the short arm from the transfer
case while using a block of wood and a floor jack to support the
weight of the transfer case. Make sure the case is held firmly in
place and the floor jack won't roll. Safety First! Then you can
remove the mount bushing from the short arm easily. Replace the
short arm on the transfer case right away.
  Don't
try installing the new heavy duty t/case mounts while the short arm
is removed. It may look easier, but the bolt must pass through the
frame before going through the short arm. This keeps the threads
pointing up and away from harm when those sharp rocks reach out for
something to grab and mangle. Many of us use a quality skid plate to
assure t/case longevity, but pointing the threads up also gives the
installation a cleaner look. Don't
try installing the new heavy duty t/case mounts while the short arm
is removed. It may look easier, but the bolt must pass through the
frame before going through the short arm. This keeps the threads
pointing up and away from harm when those sharp rocks reach out for
something to grab and mangle. Many of us use a quality skid plate to
assure t/case longevity, but pointing the threads up also gives the
installation a cleaner look. |
|||
 Once
the arm has been replaced it is time to install the new mount. Using
the same floor jack and wooden block combination, the transfer case
was lifted enough to place two new bushings in place of the
original. Once
the arm has been replaced it is time to install the new mount. Using
the same floor jack and wooden block combination, the transfer case
was lifted enough to place two new bushings in place of the
original.
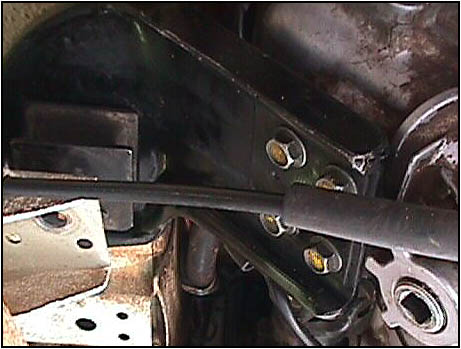
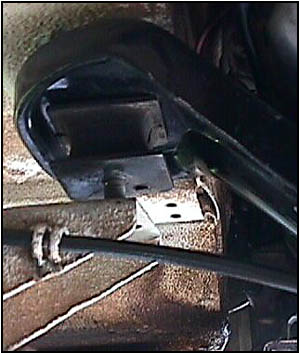
 If
you have the bolt/washer/bushing combination ready (see photo to the
left), use it to line up the bushings from underneath. While holding
the bolt firmly in place, place th final bushing on top of the short
arm followed by the washer and nylock nut. Let the transfer case
rest it's weight on the bushings to compress them. This makes it
easier to spin the nylock nut onto the threads. In the photo to the
right you can see the marks left by the stock mount when it slammed into the
body (over and over again...). If
you have the bolt/washer/bushing combination ready (see photo to the
left), use it to line up the bushings from underneath. While holding
the bolt firmly in place, place th final bushing on top of the short
arm followed by the washer and nylock nut. Let the transfer case
rest it's weight on the bushings to compress them. This makes it
easier to spin the nylock nut onto the threads. In the photo to the
right you can see the marks left by the stock mount when it slammed into the
body (over and over again...). |
|||
 Tighten
the fasteners to the point where the distance between the frame
mount and the short arm is 1-1/16". This puts the transfer case
at exactly the same level as stock. The kit comes with instructions
and a couple of those wild looking Spidertrax stickers. Tighten
the fasteners to the point where the distance between the frame
mount and the short arm is 1-1/16". This puts the transfer case
at exactly the same level as stock. The kit comes with instructions
and a couple of those wild looking Spidertrax stickers.
|
|||
|
Manufacturer:
Spidertrax Offroad Sources: Petroworks Rocky Road Outfitters |
|||
08/22/22 14:05
 We
have an area just to the east of El Paso that is popular with the sand rails
and quads called Red Sands. Wonderful dunes of super fine sand. But as you
climb the hills surrounding the dunes, the sand is speckled with rocks that
reach out and eat your lunch (if your not careful). It was after a fun climb
over a sand hill that had enough rocks in the wrong places that put me out
of action for a little while. As I applied the go pedal I heard a
thump-thump under the drivers seat... not good. I thought I had lost a drive
shaft, but when I grabbed the rear shaft and pushed on it - the whole t/case
lifted on the drivers side! Upon closer inspection I saw that the t/case
mount had ripped in half.
We
have an area just to the east of El Paso that is popular with the sand rails
and quads called Red Sands. Wonderful dunes of super fine sand. But as you
climb the hills surrounding the dunes, the sand is speckled with rocks that
reach out and eat your lunch (if your not careful). It was after a fun climb
over a sand hill that had enough rocks in the wrong places that put me out
of action for a little while. As I applied the go pedal I heard a
thump-thump under the drivers seat... not good. I thought I had lost a drive
shaft, but when I grabbed the rear shaft and pushed on it - the whole t/case
lifted on the drivers side! Upon closer inspection I saw that the t/case
mount had ripped in half.

