
|
Hi-Lift® Jack Installation with Bill Johnston I was looking for more room under the hood the other day and under some desert dirt I found the little scissors jack that Suzuki thoughtfully included with my Samurai. It was then that I realized the stock jack may not be able do it's job since I lifted the Zook. I took out the jack and extended it to it's fullest height - a full 14.25". It came to just about 7 inches below the frame. Time to get a new jack... I knew I wanted a Hi-Lift®, but I was afraid that it wouldn't fit inside the rig. I had heard tales of people actually cutting off a section of the jack to make it fit, but if I was going to spend upwards of $60 for a tool, I wasn't going to take a hacksaw to it any time soon! The Hi-Lift® jack is offered in many sizes (see the table below), so I decided to take some measurements. I found that the width of the rear area was just about 51", so I decided on the 48" all cast model (HL-485). The cast style is more capable. |
|||||||||||||||||||||||||||||||||||||||||||||
|
|||||||||||||||||||||||||||||||||||||||||||||
 Next I had to find a good location
inside, safe from the elements and safe from anyone else looking for a tall jack! Finding
a mounting location isn't very hard. Finding one that is out of the way, yet
accessible
and easy to hide was quite another. Next I had to find a good location
inside, safe from the elements and safe from anyone else looking for a tall jack! Finding
a mounting location isn't very hard. Finding one that is out of the way, yet
accessible
and easy to hide was quite another. |
|||||||||||||||||||||||||||||||||||||||||||||
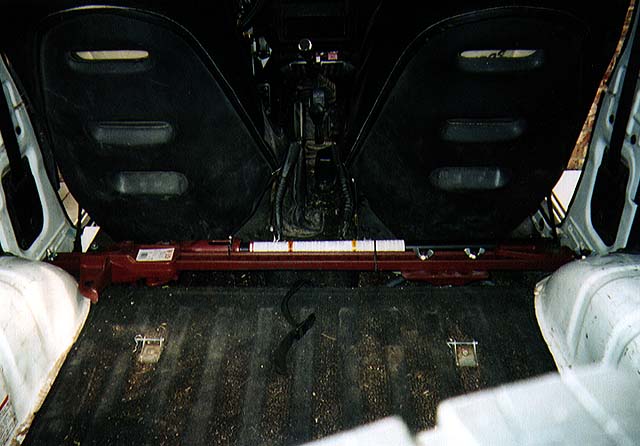
 I settled on a spot right behind the front seats going across the vehicle.
The folding back seat covers most of it to keep the honest people honest. The dishonest
ones will see a padlock, but let's be honest ourselves... if someone wants it bad enough -
they are going to get it anyway. I found a small ledge on both sides of the vehicle that
is just forward of the rear wheelwells. I took a trip to the local hardware store where I
put together a mounting kit that was simple and easy to install. For each mounting point,
I used a 2.5" (long), .5" bolt (I used a hex-head), 2 flat washers, a lock
washer, a regular nut and a large wingnut. I settled on a spot right behind the front seats going across the vehicle.
The folding back seat covers most of it to keep the honest people honest. The dishonest
ones will see a padlock, but let's be honest ourselves... if someone wants it bad enough -
they are going to get it anyway. I found a small ledge on both sides of the vehicle that
is just forward of the rear wheelwells. I took a trip to the local hardware store where I
put together a mounting kit that was simple and easy to install. For each mounting point,
I used a 2.5" (long), .5" bolt (I used a hex-head), 2 flat washers, a lock
washer, a regular nut and a large wingnut. |
|||||||||||||||||||||||||||||||||||||||||||||
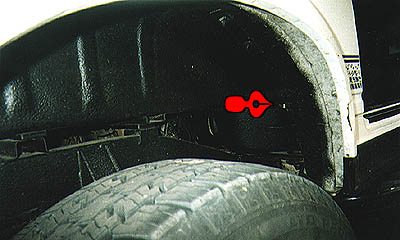 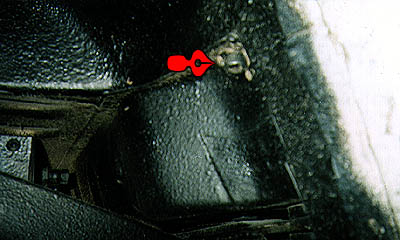 I measured for two points 44.5" apart. This will put the
bolts through the end-most holes on the jacks main rail. Stay .25" away from the
wheelwell when measuring so the lower washer will fit nice and flat, and drill straight
down through both layers of metal. You will need help from a friend to put the bolts in,
one person stays outside, and one inside to drop on the first flat washer, lock washer,
thread the nut and tighten it all down. I also used some black RTV on the bolt before
putting it in. Since it is going up through the wheelwell, waterproofing should be considered
a necessity. Drop the second flat washer on the bolt as a base for the Hi-Lift and then
drill the second mounting hole. I measured for two points 44.5" apart. This will put the
bolts through the end-most holes on the jacks main rail. Stay .25" away from the
wheelwell when measuring so the lower washer will fit nice and flat, and drill straight
down through both layers of metal. You will need help from a friend to put the bolts in,
one person stays outside, and one inside to drop on the first flat washer, lock washer,
thread the nut and tighten it all down. I also used some black RTV on the bolt before
putting it in. Since it is going up through the wheelwell, waterproofing should be considered
a necessity. Drop the second flat washer on the bolt as a base for the Hi-Lift and then
drill the second mounting hole. |
|||||||||||||||||||||||||||||||||||||||||||||
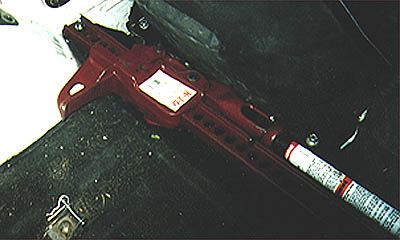  Once the
bolts have been tightened down, all that is left is to drop the Hi-Lift® in place and secure with the
wingnuts. I used an extra set of bolts and wingnuts to secure the base to the jack. This
makes for a nice 1-piece package when you need it. Once the
bolts have been tightened down, all that is left is to drop the Hi-Lift® in place and secure with the
wingnuts. I used an extra set of bolts and wingnuts to secure the base to the jack. This
makes for a nice 1-piece package when you need it. |
|||||||||||||||||||||||||||||||||||||||||||||
These jacks are a must for anyone who ventures off the beaten path. |
07/08/10 21:59