|
|
Sidewinder with a 'Kick'!
|
|
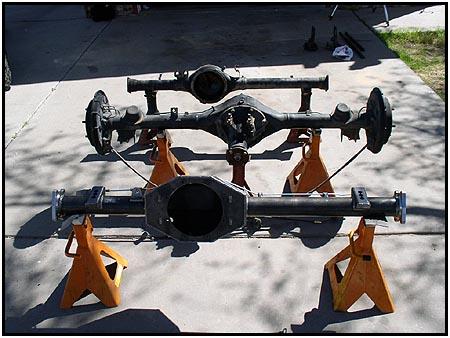
 We start with a
basically stock rear Samurai axle seen on the left. There is a pumpkin cap
welded to this one to keep all the fluid safe, but we won't need one on the
new Sidewinder... We start with a
basically stock rear Samurai axle seen on the left. There is a pumpkin cap
welded to this one to keep all the fluid safe, but we won't need one on the
new Sidewinder...
|
||
 Here you can see
some of the details that make the Sidewinder the brute that it is. On the
left you can see the inner oil seal already installed. The large outer ring
you see surrounding the seal is where you can see how thick the axle tube
really is... that is 1/4" wall tube steel. Here you can see
some of the details that make the Sidewinder the brute that it is. On the
left you can see the inner oil seal already installed. The large outer ring
you see surrounding the seal is where you can see how thick the axle tube
really is... that is 1/4" wall tube steel. 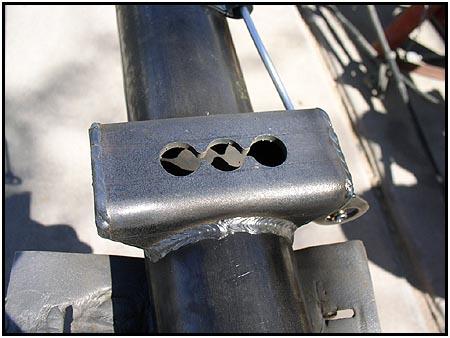 Spidertrax says you shouldn't
need any kind of external gusseting with this kind of strength. Spidertrax says you shouldn't
need any kind of external gusseting with this kind of strength.
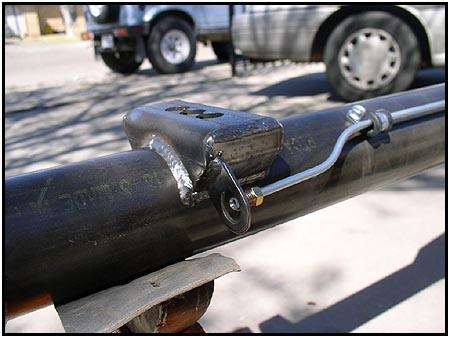
The spring perches can be welded directly to the axle housing with no fear of doing any damage. The Spidertrax perches have three positions for mounting the springs. This helps if you want to move the position of the axle. |
||
  On
the left you can see the vent opening where we will install a vent tube
later. You can also see the brake line mounts in both photos. You won't have
to worry about the lines getting in the way with these in place.
Pre-installed brake lines are a really nice option when ordering. It will
save you the trouble of messing with them later. On
the left you can see the vent opening where we will install a vent tube
later. You can also see the brake line mounts in both photos. You won't have
to worry about the lines getting in the way with these in place.
Pre-installed brake lines are a really nice option when ordering. It will
save you the trouble of messing with them later. |
||
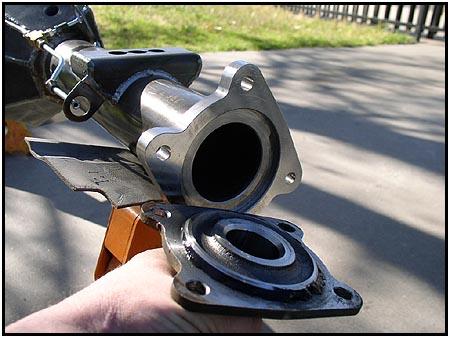
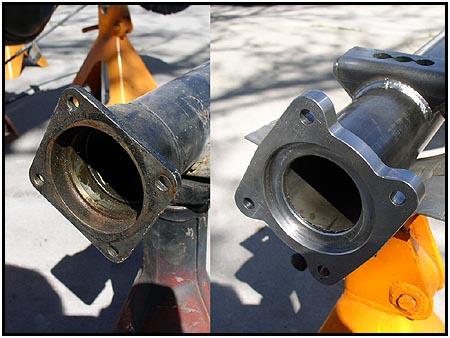  The
mounting flange looks a bit different from the stock housing seen on the
left. Not only is it much beefier, it has a different bolt pattern. Why?
because this way you can bolt on the disc brakes without an adapter plate!
This axle is a Full Floater, so that means the weight of the vehicle is on
the axle tube instead of the axle shaft. If you break an axle shaft,
you can remove it without removing the tire, brakes, etc. The
mounting flange looks a bit different from the stock housing seen on the
left. Not only is it much beefier, it has a different bolt pattern. Why?
because this way you can bolt on the disc brakes without an adapter plate!
This axle is a Full Floater, so that means the weight of the vehicle is on
the axle tube instead of the axle shaft. If you break an axle shaft,
you can remove it without removing the tire, brakes, etc. |
||
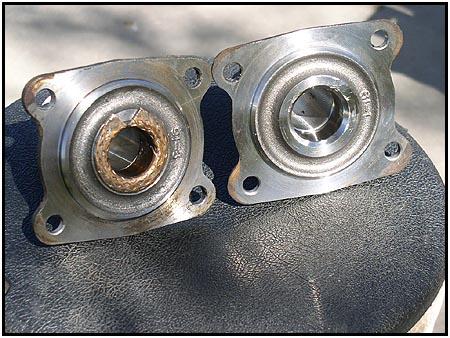
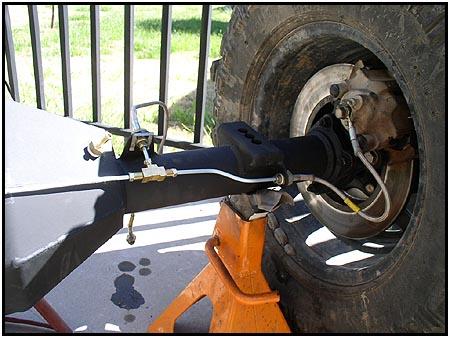
  To
allow this to happen, we use components from a Samurai front axle. In the
above right photo you can see where we had to remove the brass inner sleeve from the
front spindle so that the larger axle shaft can fit through. Sealing the
spindle with a little RTV will help keep everything water tight. To
allow this to happen, we use components from a Samurai front axle. In the
above right photo you can see where we had to remove the brass inner sleeve from the
front spindle so that the larger axle shaft can fit through. Sealing the
spindle with a little RTV will help keep everything water tight. |
||
 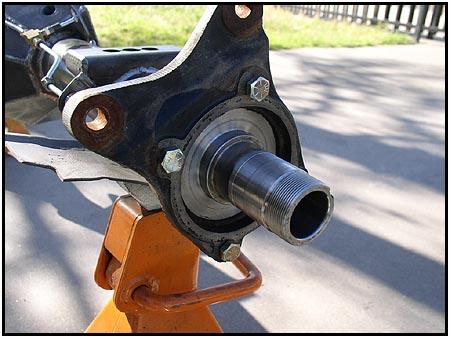 Here
you can see where a set of stock front caliper brackets are used to hang
the brakes. The axle housing is designed to make this a direct
bolt-on. Here
you can see where a set of stock front caliper brackets are used to hang
the brakes. The axle housing is designed to make this a direct
bolt-on. |
||
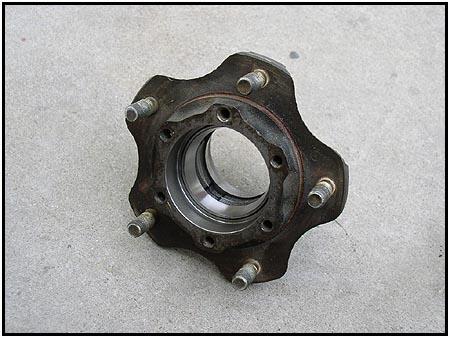  The
stock donor front wheel hubs were cleaned up and outfitted with new
bearings. As long as you have everything torn down this far, it is only
smart to replace the 10-15 year old bearings. The
stock donor front wheel hubs were cleaned up and outfitted with new
bearings. As long as you have everything torn down this far, it is only
smart to replace the 10-15 year old bearings. |
||
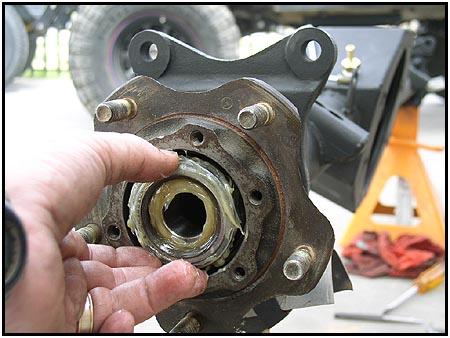  You
assemble the hub just like you would on a front housing. When you tighten
the Wheel bearing nut down, the Factory Service Manual says that you must
torque it to 7.5 - 10.5 lb-ft. You
assemble the hub just like you would on a front housing. When you tighten
the Wheel bearing nut down, the Factory Service Manual says that you must
torque it to 7.5 - 10.5 lb-ft. |
||
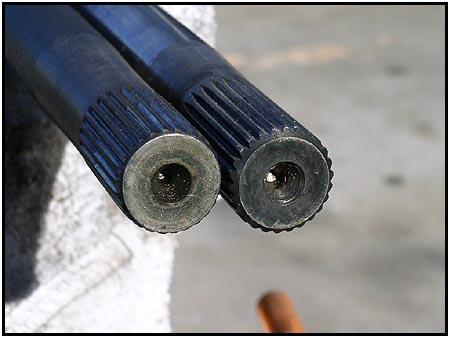  Here
you can see the chromoly axle on the left and the stock Track/Kick axle on
the right. Both are 26 spline models but the chromoly component will last
longer on the trail. There is an upgrade that Spidertrax offers that will
let you run 27 spline axles. This involves going to a new set of locking
hubs and differential sidegears. The easiest way to do this is to go to an
ARB Air Locker (as we will show next issue) and order the 27 spline
sidegears with it. Here
you can see the chromoly axle on the left and the stock Track/Kick axle on
the right. Both are 26 spline models but the chromoly component will last
longer on the trail. There is an upgrade that Spidertrax offers that will
let you run 27 spline axles. This involves going to a new set of locking
hubs and differential sidegears. The easiest way to do this is to go to an
ARB Air Locker (as we will show next issue) and order the 27 spline
sidegears with it. |
||
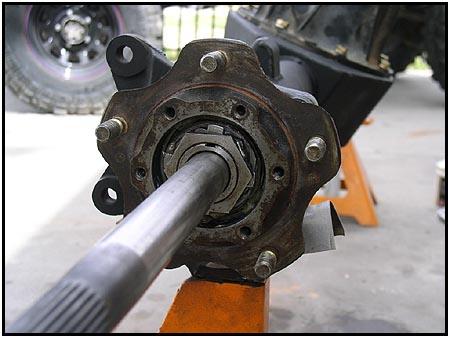
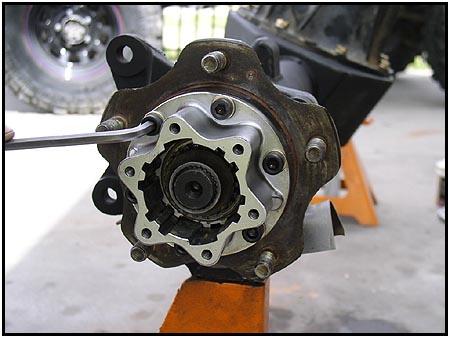 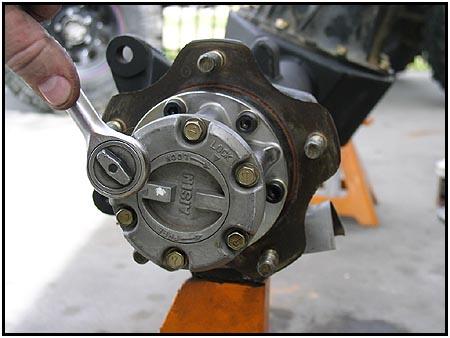 The
Spidertrax Sidewinder Full Floater comes with their upgraded hub bolt kit.
These replace the stock bolts - just make sure you use the stock
cone washers. You can get replacement cone washers from Suzuki for about
$1.25 each, and it is well worth it as it will keep the attachment tight. Assemble the locking hub
just as you would the front. The
Spidertrax Sidewinder Full Floater comes with their upgraded hub bolt kit.
These replace the stock bolts - just make sure you use the stock
cone washers. You can get replacement cone washers from Suzuki for about
$1.25 each, and it is well worth it as it will keep the attachment tight. Assemble the locking hub
just as you would the front. |
||
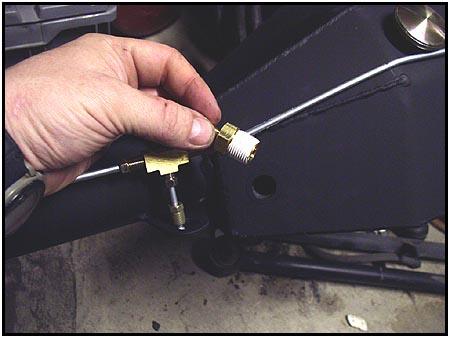
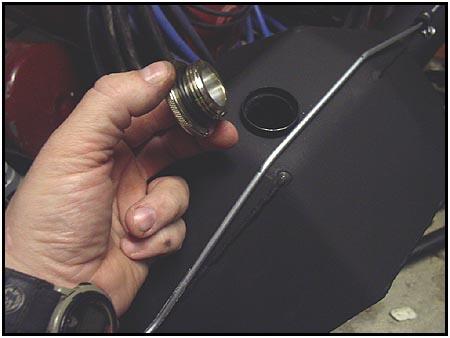
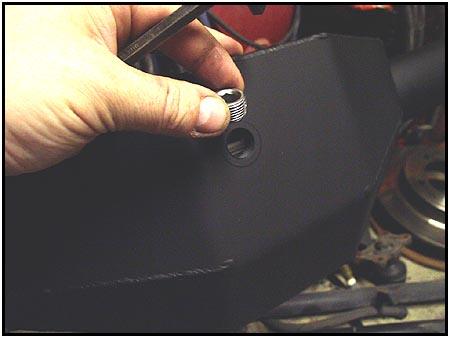
| We move on to the center of the housing to add the air vent, oil cap and drain plug. For those that have upgraded their rear drive shaft to a CV style drive line will like the fact that after rotating their axle up to face the transfer case straight on, the oil fill cap is still high enough on the pumpkin to allow plenty of room to fill it. On a stock axle that has been rotated, you must raise the rear of the vehicle about 2 feet in the air to allow the proper amount of oil to be added before it comes pouring back out the fill hole. | ||
|
|
||
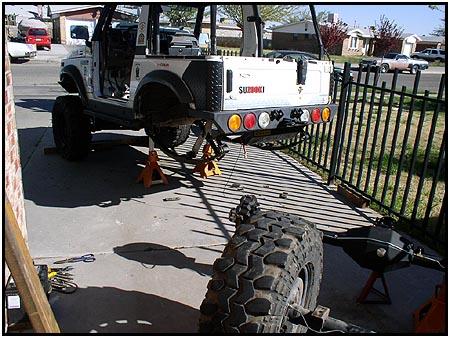
  Now
it is time to yank the stock axle. This vehicle was equipped with shock
mounts that did not attach directly to the axle housing. This is why you
will not see shock mounts on the new Sidewinder housing. Now
it is time to yank the stock axle. This vehicle was equipped with shock
mounts that did not attach directly to the axle housing. This is why you
will not see shock mounts on the new Sidewinder housing. |
||
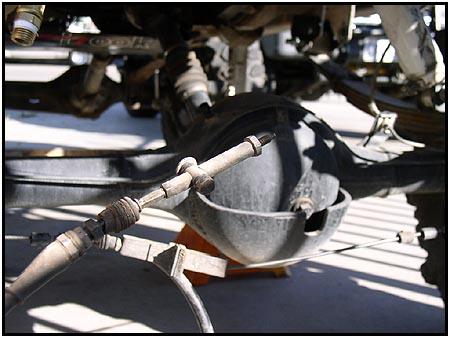  The
brake line must be disconnected. To reduce spillage we used an old front
brake line hose to 'cap off' the rear line. The emergency brake was the
next to go. In the future we plan to install a hydraulic line lick in the
rear line to replace the cable emergency brake. The
brake line must be disconnected. To reduce spillage we used an old front
brake line hose to 'cap off' the rear line. The emergency brake was the
next to go. In the future we plan to install a hydraulic line lick in the
rear line to replace the cable emergency brake. |
||
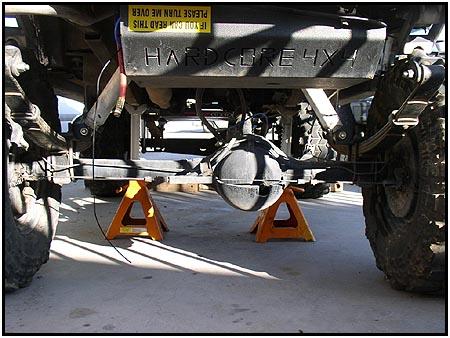
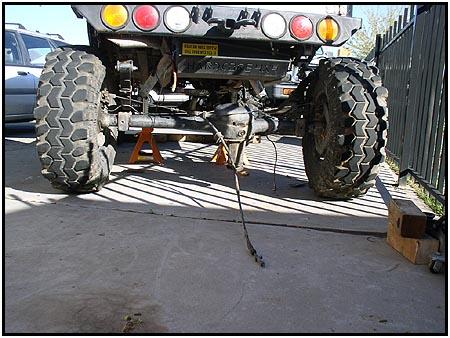  Once
the vehicle was safely on jack stands and everything was disconnected we
removed the u-bolts, disconnected the drive shaft and easily rolled the
rear axle out of the way. Once
the vehicle was safely on jack stands and everything was disconnected we
removed the u-bolts, disconnected the drive shaft and easily rolled the
rear axle out of the way. |
||
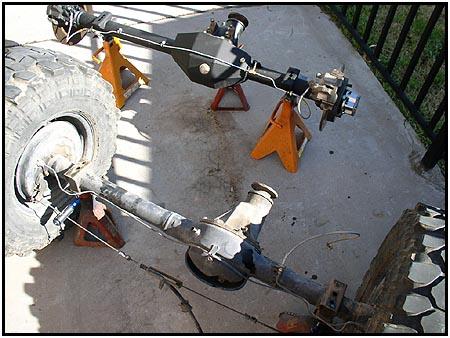  Putting
the axles side by side made it easy to transfer the pieces we were going
to reuse. These pieces only included the rear flexible brake line, and the
wheels and tires. The Sidewinder is available in three different lengths
(stock, 3" and 6" over). As you can see in the photo on the
right, we had been using Spidertrax wheel spacers to fit the Swampers
without rubbing. Spidertrax supplied us with their '3" over' model so
that we could ditch the spacers in the back and still get a little extra
clearance. Putting
the axles side by side made it easy to transfer the pieces we were going
to reuse. These pieces only included the rear flexible brake line, and the
wheels and tires. The Sidewinder is available in three different lengths
(stock, 3" and 6" over). As you can see in the photo on the
right, we had been using Spidertrax wheel spacers to fit the Swampers
without rubbing. Spidertrax supplied us with their '3" over' model so
that we could ditch the spacers in the back and still get a little extra
clearance. |
||
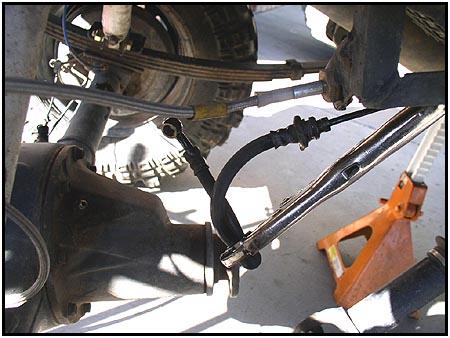
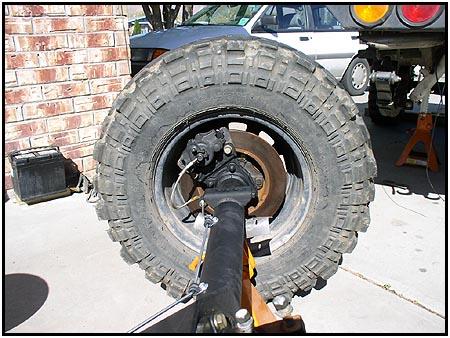  Here
you can see the brake rotor and caliper mounted on the axle. It was a
pretty straight forward install, and you can even use stock front brake
lines as they go directly to the axle where the hard lines are mounted. In
this configuration, they will never have to 'stretch' when you are
articulating. Here
you can see the brake rotor and caliper mounted on the axle. It was a
pretty straight forward install, and you can even use stock front brake
lines as they go directly to the axle where the hard lines are mounted. In
this configuration, they will never have to 'stretch' when you are
articulating. |
||
 We
rolled the new unit under the vehicle and bolted everything back up.
Remember not to jump ahead and fill the pumpkin yet... otherwise it could
get messy while you are jockeying the assembly into place. We
rolled the new unit under the vehicle and bolted everything back up.
Remember not to jump ahead and fill the pumpkin yet... otherwise it could
get messy while you are jockeying the assembly into place. |
||
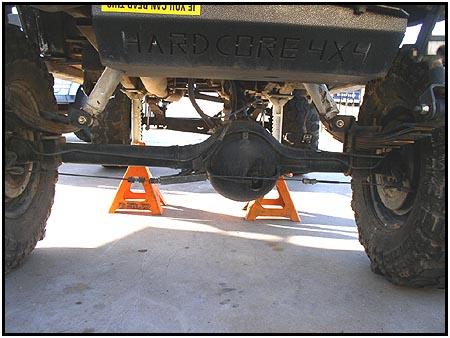
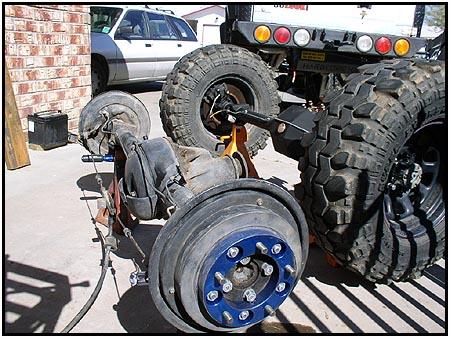
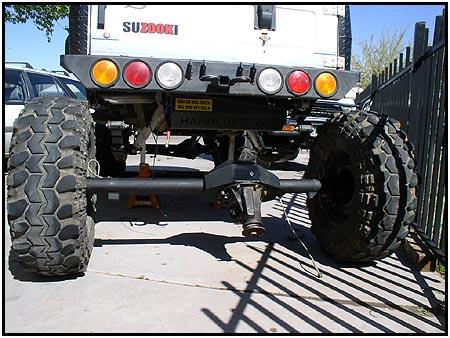
  You
can see the clearance gained between the tire and rear spring. Those are
32/11.50 Swamper SX's that are equipped with some nasty side lugs, so
clearance is always a consideration. You should also notice that although
the front axle is still equipped with spacers, the rear lines up nicely.
If you are running anything really wide, you can order the '6" over'
model and gain that much more. You
can see the clearance gained between the tire and rear spring. Those are
32/11.50 Swamper SX's that are equipped with some nasty side lugs, so
clearance is always a consideration. You should also notice that although
the front axle is still equipped with spacers, the rear lines up nicely.
If you are running anything really wide, you can order the '6" over'
model and gain that much more. |
||
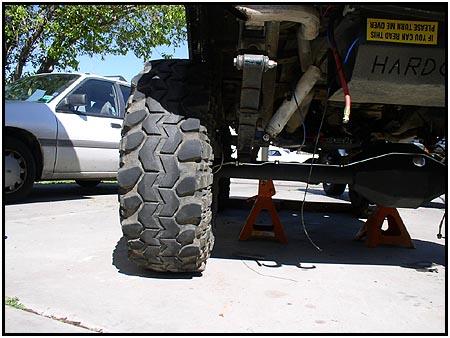
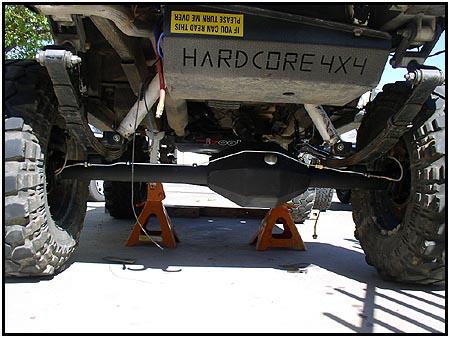 You
can see in the photos the gain of clearance under the pumpkin. This is
really beneficial considering the stock Sidekick housing would have hung
lower than the stock Samurai axle (Larger ring diameter). You
can see in the photos the gain of clearance under the pumpkin. This is
really beneficial considering the stock Sidekick housing would have hung
lower than the stock Samurai axle (Larger ring diameter). |
||
| Check out part two of this series where we will install an ARB Air Locker into the Track/Kick third member. Be sure to look for it as it is going to be of interest to both Sammy and Track/Kick owners. | ||
03/14/2017